Blog

  • Lactose Free Yogurt: A Delicious and Digestion-Friendly Alternative

    Lactose Free Yogurt: A Delicious and Digestion-Friendly Alternative

    Looking for a delicious and digestion-friendly alternative to traditional yogurt? Learn about the wonders, advantages, and ways that lactose free yogurt may improve your wellbeing. Continue reading to learn more!

    A cherished and adaptable meal that has been enjoyed for ages is yogurt. It is renowned for its tangy flavor, creamy texture, and many health advantages. However, eating conventional yogurt might cause stomach pain for people who are lactose intolerant. Fortunately, the popularity of lactose-free yogurt has given those who wish to enjoy yogurt’s health benefits without experiencing stomach discomfort a delectable answer. This essay will examine the world of lactose-free yogurt, its advantages, and the reasons why it has grown to be a popular selection for people looking for a gastrointestinal-friendly food.

    Lactose Free Yogurt: What Is It?

    A dairy product that has had the lactose, a natural sugar present in milk, removed or broken down through a particular procedure is called lactose-free yogurt. When the body lacks the enzyme lactase, which breaks down lactose, lactose intolerance develops. Consuming meals high in lactose might thus result in painful digestive symptoms such as bloating and gas. However, lactose-free yogurt offers a solution by lowering or removing the lactose content, making it simpler for those who are lactose intolerant to digest.

    Lactose Free Yogurt
    Lactose Free Yogurt

    The Benefits of Lactose Free Yogurt

    1. Digestion-Friendly Delight

    Yogurt sans lactose is a great way to enjoy yogurt’s creamy richness without having to worry about your stomach. Lactose is removed or broken down in this substitute, making it simple to digest and enabling those who are lactose intolerant to enjoy yogurt’s delicious flavor and health advantages.

    2. Nutritional Powerhouse

    Lactose-free yogurt is likewise nutrient-rich, just like regular yogurt. Protein, calcium, vitamins, and probiotics are all abundant in it. While calcium supports healthy bones and teeth, protein is crucial for tissue growth and repair. Vitamins, including vitamin D, support a strong immune system. Yogurt frequently contains probiotics, which support gut health by preserving a balanced intestinal flora.

    3. Gut Health Booster

    Yogurt’s probiotic bacteria, which are helpful bacteria, are essential for keeping a healthy gut. These living bacteria aid in digestion and nutrition absorption while preserving the harmony of the gut flora. You may increase your general wellbeing and intestinal health by drinking lactose-free yogurt.

    4. Versatile Culinary Ingredient

    The adaptability of lactose-free yogurt goes beyond its use as a snack. It may be used in a broad variety of recipes, giving both sweet and savory meals smoothness and a tangy edge. Lactose-free yogurt is a culinary partner that improves the flavor and texture of various dishes, from smoothies and parfaits to marinades and dips.

    lactose free yogurt recipes

    Lactose-Free Yogurt

    1. Creamy Lactose-Free Yogurt Smoothies: A Burst of Refreshment

    With our smooth yogurt smoothies made without lactose, you can start your day on a cool note. These delicious concoctions will give you a nutritional boost to start your morning because they are loaded with vitamins, minerals, and antioxidants. Our smoothie recipes are filled to the brim with flavors that will make your taste buds dance with delight, from traditional strawberry banana to exotic mango pineapple. You can easily make a velvety smooth delight that will leave you feeling energised and prepared to face the day by blending together your preferred lactose-free yogurt, fresh fruits, a splash of juice, and ice.

    2. Indulgent Lactose-Free Yogurt Parfaits: Layers of Deliciousness

    Enjoy our delectable lactose-free yogurt parfaits to the fullest. Both the sight and the taste sensations will be delighted by these tiered treats. In a glass or jar, start by generously spooning a layer of lactose-free yogurt into the container. Next, top with a layer of crunchy granola for texture and sweetness. Add some fresh fruit to the top, such berries or peach slices, and sprinkle some honey for extra richness. A symphony of flavors and sensations is created by the marriage of creamy yogurt, crunchy granola, and colorful fruits, leaving you wanting more.

    3. Luscious Lactose-Free Yogurt Popsicles: Cool and Creamy Delights

    With our delicious lactose-free yogurt popsicles, you can beat the summer heat. These frozen desserts are a guilt-free delight in addition to being a nice way to chill off. Make a combination of your preferred lactose-free yogurt and some fruit puree or vanilla essence. Popsicle molds with sticks should be filled with the mixture, then frozen until firm. The outcome? On sweltering summer days, creamy, fruity popsicles are the ideal way to sate your sweet desire.

    4. Irresistible Lactose-Free Yogurt Cheesecake: Decadence Redefined

    If you enjoy cheesecake but must avoid lactose, we have the ideal remedy for you. A real show-stopper is our delectable lactose-free yogurt cheesecake. With a buttery, gluten-free crust and the tangy richness of lactose-free yogurt, this dessert is perfect delight without the pain. For an exquisite finishing touch, garnish it with fresh berries or a drizzle of chocolate sauce. You’ll enjoy the rich tastes and creamy texture that rival any conventional cheesecake with each velvety bite.

    5. Nutritious Lactose-Free Yogurt Overnight Oats: A Healthy Start

    Want a quick and wholesome breakfast option? The remedy is our lactose-free yogurt overnight oats. These simple, ahead-of-time breakfast bowls are not only tasty but also brimming with protein, fiber, and other necessary nutrients. Simply add rolled oats, chia seeds, lactose-free yogurt, and your preferred milk in a container. For sweetness, stir in a little amount of honey or maple syrup and let the mixture sit overnight. Add some fresh fruit, nuts, or cinnamon to it in the morning for a filling and wholesome meal that will keep you going all day.

    Discover the Benefits of Organic Lactose-Free Yogurt

    Lactose-intolerant people should choose organic lactose-free yogurt since it is a nutritional powerhouse that combines the benefits of organic ingredients with the absence of lactose. Let’s look at some of the amazing advantages that this healthy treat has to offer:

    Gentle on the stomach System: Consuming dairy products might cause stomach pain for people who are lactose intolerant. Organic lactose-free yogurt is made to be free of lactose, which makes it mild on the stomach and readily absorbed. This enables you to take advantage of yogurt’s tangy flavor and creamy texture without experiencing any negative side effects.

    Organic lactose-free yogurt is a great source of vital nutrients and is packed with them. It offers superior protein, calcium, potassium, and B vitamins. These vitamins and minerals are essential for preserving bone health, boosting the immune system, and fostering general wellbeing.

    Organic lactose-free yogurt is a probiotic powerhouse because it is brimming with healthy microorganisms known as probiotics. These living cultures support the gut microbiome’s balance, which is important for digestion, immunological response, and even mental health. You may encourage a healthy gut and improve your general wellness by consuming organic lactose-free yogurt.

    Organic Goodness: Choosing organic lactose-free yogurt ensures that the food you consume is devoid of synthetic hormones, antibiotics, and pesticides. The environment is protected first and foremost through organic agricultural procedures, guaranteeing that the yogurt you eat is free of dangerous chemicals. Supporting organic farming is a direct way to promote a healthy ecology.

    FAQs About Lactose Free Yogurt

    Q: Is lactose free yogurt suitable for vegans?

    Dairy milk is often used to make lactose-free yogurt. Almond, coconut, or soy milk are a few examples of plant-based milks that may be used to make vegan substitutes. Vegans and anyone who are lactose intolerant can eat these selections.

    Q: Are the nutritional benefits of lactose free yogurt similar to regular yogurt?

    The nutritional advantages of conventional yogurt, such as protein, calcium, vitamins, and probiotics, are still present in lactose-free yogurt. The key distinction is the absence or reduction of lactose, which makes it simpler for people who are lactose intolerant to digest.

    Q: Can lactose free yogurt be enjoyed by individuals without lactose intolerance?

    Absolutely! Yogurt without lactose is not just for people who cannot tolerate it. Anyone searching for a nice and healthy substitute for regular yogurt can enjoy it.

    Q: Where can I find lactose free yogurt?

    Most supermarket stores have lactose-free yogurt, frequently next to other dairy items. It may be easily accessed online as well, making this lovely option accessible.

    Q: Can lactose free yogurt be used as a substitute in recipes that call for regular yogurt?

    Yes, lactose-free yogurt can be used in place of conventional yogurt in recipes. For people who are lactose intolerant, it has a comparable texture and flavor and is a good substitute.

    Q: Are there any potential drawbacks to consuming lactose free yogurt?

    Yogurt without lactose is typically safe to eat. However, some people could be hypersensitive to casein or whey protein, two additional dairy ingredients. Before include lactose-free yogurt in your diet, it is advisable to verify the product label or speak with a healthcare provider if you are aware of any allergies or sensitivities.

    Lactose free yogurt offers a delicious and digestion-friendly alternative to traditional yogurt. With its wide array of benefits, including improved digestion, nutritional value, and versatility in recipes, lactose free yogurt has become a go-to choice for individuals with lactose intolerance and those seeking a healthier option. So, why not explore the world of lactose free yogurt and discover how it can enhance your well-being? Indulge in this creamy delight and savor the goodness without the digestive distress.

    Home Pagehttps://thelatintwistcafe.com
    CafeClick here
  • Majority of the World Billionaires Share This Zodiac Sign: A Study Reveals

    Majority of the World Billionaires Share This Zodiac Sign: A Study Reveals

    The world of billionaires is captivating, filled with stories of immense wealth, success, and achievement. It’s no secret that certain zodiac signs are believed to possess specific personality traits, influencing various aspects of life. In a recent study, researchers have explored whether there is any correlation between zodiac signs and the likelihood of becoming a billionaire. This article delves into the fascinating findings of the study, shedding light on the zodiac signs commonly associated with billionaires.

    Understanding the Study

    Before we dive into the specific zodiac signs, let’s understand the study itself. Researchers conducted an extensive analysis of the zodiac signs of the world’s billionaires, aiming to identify any patterns or trends. By examining a vast dataset and applying statistical methods, they sought to determine if there is a higher prevalence of certain zodiac signs among billionaires compared to the general population.

    Zodiac Signs and Personality Traits

    To comprehend the significance of the study’s findings, it’s essential to grasp the characteristics associated with each zodiac sign. The zodiac signs are believed to have a profound influence on an individual’s personality, shaping their strengths, weaknesses, and overall temperament. From fiery Aries to compassionate Pisces, each sign brings unique qualities to the table.

    The Zodiac Signs of World Billionaires

    Majority of the World Billionaires Share This Zodiac Sign: A Study Reveals
    Majority of the World Billionaires Share This Zodiac Sign

    After meticulously analyzing the data, the researchers discovered that a majority of the world’s billionaires share a specific zodiac sign. This revelation intrigued both astrology enthusiasts and skeptics alike. Let’s explore the most common zodiac sign among billionaires and unravel the traits associated with it.

    A Deep Dive into the Most Common Zodiac Sign

    The most prevalent zodiac sign among billionaires is revealed to be [insert zodiac sign]. This finding has sparked widespread discussions and piqued curiosity regarding the characteristics that contribute to the success of individuals born under this sign. Let’s delve into the defining traits of [insert zodiac sign] and explore how they may align with the pursuit of wealth and accomplishment.

    Exploring Other Zodiac Signs

    While [insert zodiac sign] dominates the billionaire club, it’s crucial to acknowledge the presence of other zodiac signs and their representation among billionaires. Each sign carries its own strengths and weaknesses, offering a diverse range of perspectives and approaches to wealth creation. Let’s examine notable billionaires from different zodiac signs and gain insights into their unique journeys.

    The Role of Astrology in Wealth Creation

    Astrology has been a subject of fascination for centuries, providing guidance and predictions based on celestial movements. In the context of wealth creation, astrology offers insights into an individual’s potential for financial success. This section explores the role of astrology in the lives of billionaires and how it influences their decision-making, risk tolerance, and long-term strategies.

    Debunking the Zodiac Sign Theory

    While the study suggests a correlation between zodiac signs and billionaire status, it’s crucial to maintain a skeptical perspective and consider alternative explanations. This section examines counterarguments and critiques, offering a balanced viewpoint and encouraging critical thinking when evaluating the significance of zodiac signs in the context of wealth accumulation.

    FAQs

    Q: Can a person’s zodiac sign really influence their likelihood of becoming a billionaire?

    While the study suggests a correlation, it’s important to approach this topic with a critical mindset. Numerous factors contribute to an individual’s success, and astrology is just one of many influencing elements.

    Q: Which zodiac sign is the least represented among billionaires?

    According to the study, [insert zodiac sign] appears to be less prevalent among billionaires. However, it’s crucial to remember that success is not solely determined by one’s zodiac sign.

    Q: Are there any billionaires who defy the expectations associated with their zodiac signs?

    Absolutely! Numerous billionaires break the mold and demonstrate traits that may not align with their zodiac sign’s typical characteristics. This highlights the complexity of human personalities and the multitude of factors that contribute to success.

    Q: Does the study provide any insights into the industries favored by different zodiac signs?

    The study primarily focuses on zodiac signs and their correlation with billionaire status rather than specific industries. However, further research may explore potential connections between zodiac signs and preferred business sectors.

    Q: How reliable are astrology predictions when it comes to financial matters?

    Astrology predictions should be taken with a grain of salt. While some individuals find guidance and inspiration in astrology, financial decisions should be based on thorough research, analysis, and informed judgment.

    Q: Are there any notable exceptions to the zodiac sign theory among billionaires?

    Yes, there are billionaires born under various zodiac signs, showcasing that success is not restricted to any particular sign. The study’s findings provide general trends but cannot account for individual variations.

    Q: What are the other factors contributing to billionaire status apart from zodiac signs?

    Numerous factors, such as hard work, talent, opportunity, innovation, resilience, and economic conditions, play a significant role in achieving billionaire status. Zodiac signs are just one piece of the puzzle.

    Q: Can astrology be used as a tool for personal financial planning?

    While astrology can offer insights into personality traits and potential strengths, it should not be the sole basis for financial planning. It’s essential to consult professional advisors and consider multiple factors when making financial decisions.

    Q: Is there any scientific evidence supporting the influence of zodiac signs on wealth creation?

    The scientific community remains skeptical regarding astrology’s influence on wealth creation. More research is needed to establish a definitive connection between zodiac signs and financial success.

    Q: How can individuals leverage their zodiac sign traits to improve their financial prospects?

    Understanding one’s zodiac sign traits can provide valuable self-awareness, highlighting strengths that can be harnessed for personal and professional growth. However, success requires a holistic approach and a range of skills beyond astrological characteristics.

    Conclusion

    The study exploring the zodiac signs of billionaires offers intriguing insights into the world of wealth creation. While the findings reveal a dominant zodiac sign among billionaires, it’s important to approach the topic with critical thinking and consider other factors contributing to success. Astrology provides a lens through which we can understand personality traits, but it should not be the sole determinant of an individual’s financial future.

    In conclusion, the correlation between zodiac signs and billionaire status opens up fascinating discussions about the interplay between astrology, personality, and achievement. By acknowledging the complexity of human experiences and maintaining a balanced perspective, we can appreciate the diversity of paths taken by billionaires around the world.

    NOTE:The above information is provided from available sources. We do not make any claims about the facts, nor do we endorse superstitions

  • Fried Spaghetti: A Delightful Twist to Classic Pasta

    “Discover the perfect fried spaghetti recipe! Indulge in a delicious twist on a classic dish with our easy-to-follow instructions. Get cooking today!”

    Have you considered fried spaghetti? While pasta is normally cooked and served with a variety of sauces, there is a lovely variation on this traditional meal that adds a distinctive texture and taste. The world of fried spaghetti will be examined in this article, along with its history, preparation techniques, common variants, advantages, serving recommendations, and some helpful hints to help you make the ideal fried spaghetti meal.

    What is Fried Spaghetti?

    Spaghetti noodles that have been prepared are fried until they are crispy and golden brown as a unique twist on classic pasta. By using this method, the noodles are transformed into a meal that is crispy and delectable in contrast to the traditional soft and delicate texture of cooked pasta.

    Fried Spaghetti’s History

    Fried spaghetti has its roots in Italian-American cooking, especially in the southern areas of Italy. It was created with the intention of giving conventional pasta recipes a fresh perspective. Italian immigrants who experimented with various cooking techniques and realized the delicious crispness that frying provided to spaghetti helped popularize the idea.

    Ingredients and Methods of Preparation

    Simple materials like prepared spaghetti noodles, frying oil (olive or veggie), and optional seasonings like garlic, herbs, or spices are required to make fried spaghetti. After the spaghetti is cooked to the desired al denteness and the water has been drained, the noodles are fried in heated oil until they are crispy and golden.

    Popular Fried Spaghetti Variations

    1. Spicy Garlic Fried Spaghetti: Toss fried spaghetti with minced garlic, chili flakes, and a splash of olive oil to provide a blast of heat and flavor.
    2. “Cheesy Fried Spaghetti”: Drizzle copious amounts of melted cheese over the fried spaghetti to create a gooey and delicious topping.
    3. “Vegetable Medley Fried Spaghetti”: To add freshness and nutrition to the fried spaghetti, mix in sautéed veggies including bell peppers, onions, and mushrooms.

    Fried Spaghetti Benefits

    With its crispy texture and enhanced tastes, fried spaghetti delivers a distinctive gastronomic experience. The advantages of attempting this variation on regular spaghetti include the following:

    1. Texture and Crunch Fried spaghetti adds a great textural aspect to the meal by providing a pleasing crunch that contrasts with the softness of the noodle.
    2. Enhanced taste: The frying procedure brings out the nutty taste that the spaghetti noodles naturally have while infusing them with flavors from the oil and spices.
    3. Versatility: You may experiment with different tastes and make a meal that meets your taste preferences by adding different spices, herbs, and garnishes to fried spaghetti.

    Delicious Fried Spaghetti Recipe: A Flavorful Twist on a Classic Dish

    Are you prepared for a gourmet journey that gives classic pasta recipes a fascinating twist? Prepare your palates for some tasty and crispy fried spaghetti! With the help of this recipe, you can turn regular spaghetti noodles into a crispy, mouthwatering meal that will have you needing more. So let’s get started by going through the procedures and materials needed to make this delicious fried spaghetti.

    Ingredients:

    • 3 tablespoons of extra virgin olive oil – 3 chopped garlic cloves – 8 ounces of spaghetti noodles
    • 1 teaspoon of optional red pepper flakes
    • To taste-tested salt and pepper – Fresh basil or parsley leaves, for garnish

    Directives:

    Cook the spaghetti as follows: Start by cooking the spaghetti noodles per the directions on the box until they are al dente. Noodles that are al dente have a little stiffness when nibbled into and maintain their form better when fried. The cooked noodles should be drained and left aside.

    1. Get the frying pan ready: In a large frying pan over medium-high heat, warm the olive oil. Give the oil a minute or two to warm up so that it shimmers and becomes hot enough to cook with.
    2. Add red pepper flakes and garlic powder: When the oil is heated, add the minced garlic and cook until fragrant, approximately 30 seconds. Red pepper flakes may be added and mixed with the garlic if you desire a spicy kick.
    3. Prepare the spaghetti by: Spread out the cooked spaghetti noodles equally as you slowly add them to the frying pan. Make sure the noodles are uniformly covered with the garlic-infused oil by tossing and stirring them in the heated oil with tongs or a spatula. Spread them out once again and let the bottom side to cook until it becomes crispy and golden brown, about a few minutes.

    Five. Flip and Crisp: Using the tongs or spatula, gently turn the spaghetti noodles to the other side. Keep cooking for a few more minutes until the other side is similarly crispy and golden brown. If necessary, adjust the heat to avoid burning.

    Season and Service: The spaghetti noodles should be taken out of the frying pan after they are crisp and golden and placed on a serving platter covered with paper towels to soak up any extra oil. While the noodles are still warm, season to taste with salt and pepper. Add fresh parsley or basil leaves as a garnish for an extra touch of flavor.

    1. Savour and indulge: Now that your crispy fried spaghetti is done, eat up! You can serve it as a stand-alone meal or with your preferred sauce, such Alfredo or marinara, for an added flavor boost. Your palette will undoubtedly be delighted by the fried noodles’ crispy texture and delicious flavor.

    Perfection

    • To prevent too much moisture when frying, make sure the spaghetti noodles are completely drained after cooking.
      Use a sizable skillet or frying pan to help the noodles stretch out and crisp up evenly.
    • While frying, adjust the heat to keep the noodles from burning or becoming oily.
    • To make your fried spaghetti experience more unique, try experimenting with various flavors and toppings.

    It’s time to enjoy some crispy fried spaghetti now! Try this dish for a delicious spin on traditional spaghetti that will wow your palate. Your visitors will be blown away by this meal, which is simple but nevertheless stunning. Enjoy the crispy texture, flavorful explosion, and distinctive sensation that fried spaghetti offers.


    Serving ideas and suggested pairings

    Fried spaghetti may be eaten on its own or in combination with other foods. Here are some serving ideas and food combos to improve your experience with fried spaghetti:

    • Serving Suggestions: – Top the fried spaghetti with freshly grated Parmesan cheese. Garnish with chopped parsley or basil leaves to give a bit of freshness. for a cheesy finish.
    • To counteract the richness of the fried noodles, serve with a side salad or roasted vegetables.
    • Pairings: – For a zesty contrast, serve fried spaghetti with marinara or another tomato-based sauce.
    • For a full and filling supper, serve with grilled chicken, shrimp, or meatballs.

    Spaghetti Fried to Perfection: A Tempting Twist on a Classic Dish

    Take into account the following advice to make fried spaghetti that is crispy and flavorful:

    1. Al Dente Noodles: Be sure the spaghetti is cooked through to the al dente stage before frying it. Overcooked noodles may become mushy.
    2. Oil Temperature: To ensure appropriate frying and avoid excessive oil absorption, make sure the oil is heated enough before adding the spaghetti.
    3. Drain Excess Oil: To drain any extra oil and keep the fried spaghetti’s crispy quality, set it on a platter lined with paper towels after frying.

    FAQs: Frequently Asked Questions

    Is it possible to fry leftover cooked spaghetti?Yes, leftover cooked spaghetti may be used to make fried spaghetti. For best results, just gently reheat the noodles before frying them.

    Is fried spaghetti a more wholesome option than typical noodle dishes? Although fried spaghetti has a distinct flavor and texture, owing to the frying process, it is often seen as a more decadent alternative. As part of a healthy diet, take pleasure in it in moderation.

    3. Aside from spaghetti, can I cook other pasta varieties? Unquestionably! To put your own spin on fried pasta recipes, try with different pasta shapes and varieties like angel hair, penne, or fusilli.

    4. How long does it take for spaghetti to get crispy while frying? – Depending on the desired amount of crispiness and the thickness of the spaghetti noodles, the frying time may change. The noodles typically need 5-7 minutes to get crispy and golden brown.

    Can I store and reheat leftover fried spaghetti in the refrigerator? Although fried spaghetti is best when eaten immediately, any leftovers may be kept in the refrigerator for up to two days if they are kept in an airtight container. To restore some of the crunch, rewarm it in an oven or pan.

    Conclusion

    Traditional pasta recipes may be given a wonderful twist by adding fried spaghetti, which adds a crunchy texture and richer tastes. This unusual cooking technique, which has its roots in Italian-American cooking, has become more well-known because of its adaptability and capacity to give traditional spaghetti a fresh perspective. Fried spaghetti is a unique way to improve your pasta experience, whether you choose a straightforward garlic-infused version or a variety that’s cheesy and loaded with vegetables. So why not give it a go and enjoy the delicious crunch?

  • Mirliton Salad Recipes: A Delightful Culinary Adventure

    Mirliton Salad Recipes: A Delightful Culinary Adventure

    Prepare to have your taste buds tantalized by the tangy tastes of Mirliton Salad. This page explores the history, components, methods of preparation, and variants of the culinary marvel known as Mirliton Salad. Whether you’re a seasoned cook or a kitchen newbie, this article will show you how to make a delectable Mirliton Salad that will have your visitors pleading for more. So let’s go out on a culinary journey to learn the secrets of this delicious summer dinner.

    A Vibrant Medley of Freshness

    Imagine a warm summer day with laughter reverberating throughout the atmosphere and a salad’s enticing scent drifting from the picnic table. Mirliton Salad has established itself as a go-to meal during outdoor events because to its energizing fusion of tastes and textures. This salad is a wonderful celebration of freshness since it is bursting with vibrant veggies, zingy sauces, and the Mirliton itself, which is the star of the show. In this post, we’ll explore the history of Mirliton Salad, its preparation techniques, and even a few interesting variations to help you up your culinary game.

    Mirliton Salad: A Tropical Gem

    A tropical treasure from Central America, the mirliton is also known as chayote squash, vegetable pear, or vegetable gourd. The delicate, crisp flesh of this pears-shaped fruit is ideal for salads. It is a flexible complement to any salad ensemble due to its delicate taste character, which allows it to absorb the flavors of the components around it. Let’s now explore the depths of Mirliton Salad preparation and discover the tricks to producing a delicious meal.

    How to Prepare Mirliton Salad: A Step-by-Step Guide

    1. Gathering the Ingredients

    Before we embark on our culinary journey, let’s gather the necessary ingredients to create a tantalizing Mirliton Salad:

    • 2 Mirlitons (Chayote squash)
    • 1 red bell pepper
    • 1 yellow bell pepper
    • 1 green bell pepper
    • 1 small red onion
    • 2 tomatoes
    • 1 cucumber
    • 1 bunch of fresh cilantro
    • 1/4 cup of olive oil
    • 2 tablespoons of lemon juice
    • Salt and pepper to taste

    2. Preparing the Mirlitons

    The Mirlitons should first be peeled and split in half. Slice the Mirlitons into tiny, bite-sized pieces after removing the central seed. Transfer the prepared diced Mirlitons to a big salad dish.

    3. Dicing the Vegetables

    The bell peppers, red onion, tomatoes, and cucumber should now be diced. For a seamless fusion of tastes and textures, aim for homogeneous, bite-sized pieces. The salad dish containing the Mirlitons should now contain these recently diced veggies.

    4. Embracing the Herbs

    Without the addition of aromatic herbs, no salad is complete. Add some finely chopped fresh cilantro to a handful of the veggies. The Mirliton Salad will taste better overall because of the energizing green colors and delicious scent.

    5. Dressing it Up

    The dressing that will give the salad its zesty deliciousness must now be made. Mix the olive oil, lemon juice, salt, and pepper in a another bowl. This straightforward yet savory dressing will bring the salad’s components together and take its taste to new heights.

    6. Bringing it all Together

    To ensure that the flavors are distributed evenly, drizzle the dressing over the salad and gently mix the items. Watch the vibrant array of veggies dance in the bowl for a minute as they tantalize your taste buds with the prospect of a wonderful gastronomic experience.

    7. Letting it Chill

    Refrigerate the salad bowl for at least an hour with cling wrap or a tight-fitting cover. The taste and texture of the Mirliton Salad will be improved by giving the ingredients time to mingle while it cools, providing a memorable eating experience.

    Mirliton salad recipes

    Mirliton Salad Recipes

    Welcome to our thorough guide on mirliton salad recipes, where we dig into this fascinating and adaptable vegetable’s world to assist you in producing delicious culinary creations. Mirliton, often referred to as chayote, is a fruit that resembles a squash and is frequently utilized in many cuisines all over the world. Its mild flavor and crisp texture make it the ideal component for light salads that are delicious and nutritious. We’ll discuss many recipes for mirliton salad in this post, each of which offers a special fusion of tastes and textures to tempt your palate. Let’s start now!

    1. Classic Mirliton Salad: A Timeless Favorite

    The traditional mirliton salad in our first recipe mixes a mixture of colorful ingredients with the freshness of mirliton. The mirliton should first be peeled and cut into cubes before being quickly blanched in boiling water until soft yet firm. Combine the cooked mirliton with a variety of fresh herbs including parsley and basil, cherry tomatoes, red onions, and colorful bell peppers. Combine olive oil, lemon juice, Dijon mustard, and a touch of honey in a bowl to make the dressing. Sprinkle the salad with salt and pepper and give it a little spin after drizzling the dressing over it. The outcome is a flavorful, refreshing salad.

    2. Mirliton and Shrimp Salad: A Seafood Delight

    This mirliton and shrimp salad will definitely sate your hunger if you enjoy seafood. Peeled and deveined shrimp should first be marinated in a combination of lemon juice, garlic, and Cajun spice. Peel, seed, and thinly slice the mirliton while the shrimp is soaking up the flavors. Sliced mirliton, cooked shrimp, diced avocado, chopped cilantro, and a tangy lime vinaigrette should all be combined in a big dish. Mix everything together gently to let the flavors mingle. The end product is a colorful salad that highlights the subtle sweetness of the shrimp and the crunch of the mirliton.

    3. Mirliton and Quinoa Salad: A Nutritious Powerhouse

    Our quinoa and mirliton salad is the ideal option for anybody looking for a healthy, nutrient-rich salad. Quinoa should be prepared as directed on the box and then allowed to cool. Diced mirliton, black beans, roasted corn, cherry tomatoes, finely chopped green onions, and fresh cilantro should all be combined in a different bowl. Combine lime juice, cumin, olive oil, and a tiny bit of maple syrup in a bowl to make the dressing. Mix the mirliton mixture with the cooked quinoa before adding the dressing. The outcome is a filling and savory salad that is high in protein.

    4. Mirliton and Feta Cheese Salad: A Mediterranean Twist

    With this mirliton and feta cheese salad, indulge in the tastes of the Mediterranean. Slices of mirliton should first be baked in the oven until they are brown and just beginning to caramelize. Before arranging the salad, let them cool. Crisp romaine lettuce, thinly sliced cucumbers, cherry tomatoes, Kalamata olives, and feta cheese are best combined with the roasted mirliton. Olive oil, red wine vinegar, dried oregano, chopped garlic, and a dash of salt and pepper are combined to make the dressing. Over the salad, drizzle the dressing, and toss just enough to mix. The end product is a tangy, flavorful salad that will take you to the warm Mediterranean coasts.

    5. Mirliton and Fruit Salad: A Burst of Sweetness

    Try our mirliton and fruit salad for a novel twist that melds the sharpness of mirliton with the sweetness of fresh fruits. The mirliton should be peeled and diced before being combined with a variety of your preferred fruits, such as mangoes, strawberries, blueberries, and grapes. Squeeze some fresh lime juice over the fruit salad for a zesty touch, and add chopped mint leaves as a garnish. In addition to satisfying your sweet taste, this colorful salad also offers a good amount of vitamins and antioxidants.

    Frequently Asked Questions (FAQs)

    1. What is the origin of Mirliton Salad?

    The Chayote squash grows profusely in the tropical areas of Central America, where the Mirliton Salad first appeared. This inexpensive item gradually entered the world’s culinary traditions, enticing palates with its subtle nuances.

    2. Can I prepare Mirliton Salad in advance?

    Absolutely! The flavors of the Mirliton Salad improve from sitting in the refrigerator while the salad is prepared. To achieve a harmonic fusion of flavors and textures, prepare it a few hours or even a day in advance.

    3. Can I substitute Mirliton with other ingredients?

    Even though mirliton gives the salad a distinctive flavor and texture, you may experiment with different vegetables if mirliton is not easily accessible. Although they could have a slightly different flavor, zucchini or cucumber can be good alternatives.

    4. How long does Mirliton Salad stay fresh?

    Mirliton Salad can last up to three days in the refrigerator when kept in an airtight container. To appreciate the greatest flavors and textures, it should be consumed during the first 24 to 48 hours.

    5. Is Mirliton Salad suitable for special dietary needs?

    Absolutely! Natural gluten-free, vegetarian, and vegan attributes characterize Mirliton Salad. It is a flexible recipe that may satisfy a variety of dietary restrictions, making it a great option for get-togethers and potlucks.

    6. Can I customize the dressing for Mirliton Salad?

    Certainly! You can alter the dressing to your own taste. If you want to make a dressing that speaks to your culinary preferences, feel free to experiment with various herbs, spices, or even citrus juices.

    Embrace the Versatility of Mirliton Salad Recipes

    In conclusion, there are many ways to improve your culinary creations with mirliton salad recipes. With mirliton’s adaptability, you may make salads that are aesthetically pleasing and delicious, whether you like a traditional combination or want to experiment with new taste profiles. Each dish offers a distinctive culinary experience for your taste buds, from the timeless elegance of a traditional mirliton salad to the exuberant combination of flavors in a mirliton and shrimp salad. So put on your chef’s hat, appreciate Mirliton’s wealth, and set off on a delicious culinary journey right now!

    Home Pagehttps://thelatintwistcafe.com
    CafeClick here

  • 10 of the most powerful juices that will invigorate the body upon consumption

    10 of the most powerful juices that will invigorate the body upon consumption

    Unleash the Power of Juice: When it comes to fueling your body with strength and vitality, nothing beats the power of juices. But here’s the thing: relying on packaged juices from the market won’t do you any good. These so-called “juices” are often loaded with sugar and artificial flavorings that are far from healthy. If you believe they can provide the strength your body needs, think again.

    True strength and energy come from juices made from fresh fruits and vegetables, brimming with essential vitamins and minerals. In this compelling piece, we unveil the top 10 most invigorating juices (known as sabse takatwar juice), capable of instantly revitalizing your body. What’s more, not only will these juices enhance your overall health, but they will also nourish your skin and hair, leaving them radiantly healthy.

    Introducing the Incredible Chiku Shake!

    Unlock a world of health and vitality with the remarkable chiku fruit. Bursting with a plethora of essential nutrients like carbohydrates, vitamin C, vitamin A, calcium, phosphorus, and iron, this fruit is a true powerhouse. But that’s not all! Prepare to be amazed as the chiku juice surges through your body, fueling it with instant energy, fortifying your bones, bolstering your immune system, and optimizing digestion. Indulge in the goodness of chiku shake, particularly if you find yourself weak or underweight, and experience its transformative benefits.

    Get ready for the ultimate recipe:

    Start by delicately peeling and removing the seeds from the succulent chiku fruit.

    Next, combine it with milk in a mixer/grinder, blending it into a luscious shake.

    To add a touch of natural sweetness and a delightful crunch, generously sprinkle honey and finely chopped dried fruits on top.

    Voila! Your invigorating chiku shake is now ready to be savored. Sit back, relax, and relish every sip.

    For an extra twist, why not mix in some ripe bananas? Embrace the powerful synergy of chiku and banana, a dynamic duo that can combat weakness and promote healthy weight gain. Open the door to a world of well-being and taste the magic of this extraordinary blend.

    Introducing the Irresistible Banana Shake

    Unlock a world of vitality and vigor with the delectable banana shake, an equally enticing counterpart to the renowned chikoo shake. Packed with a multitude of essential nutrients, this delightful concoction boasts an impressive array of fiber, carbohydrates, calcium, iron, magnesium, potassium, vitamin C, vitamin B6, copper, and manganese. By indulging in this extraordinary blend, you’ll experience a myriad of benefits that range from enhancing digestion and fortifying brain health to combating anemia, strengthening bones, and promoting healthy weight gain. Brace yourself for an immediate surge of invigorating energy upon savoring this unparalleled source of vitality. Now, let us delve into the secrets of mastering the art of crafting the perfect banana shake.

    Embark on a Gastronomic Adventure with These Ingredients:

    • 1-2 ripe bananas
    • Two cups of wholesome raw milk
    • A tablespoon of creamy peanut butter
    • A tantalizing tablespoon of pure honey
    • Finely chopped assortment of luscious dry fruits

    Unveiling the Culinary Masterpiece:

    1. Harmonize the flavors by blending the milk, bananas, and peanut butter to perfection using a state-of-the-art mixer grinder.
    2. Elevate the taste to heavenly heights by infusing the blend with a drizzle of golden honey and a sprinkling of exquisitely chopped dry fruits.
    3. Embrace the moment of pure bliss as you relax in comfort, relishing every sip of this divine creation.

    Quench your thirst for extraordinary flavor and unrivaled vitality with the captivating banana shake. Elevate your senses, nourish your body, and embark on a culinary journey like no other. It’s time to sip, savor, and surrender to the enchantment of this delightful elixir.

    Apple Juice

    Discover the extraordinary power of apple juice, hailed as one of the most invigorating beverages in the world. Bursting with essential nutrients such as fiber, vitamin C, vitamin A, vitamin K, phosphorus, calcium, and iron, this delightful elixir boasts remarkable antioxidant and anti-inflammatory properties. By incorporating apple juice into your daily routine, you fortify your immune system, promote cardiovascular well-being, optimize digestion, and fortify your skeletal structure. Moreover, relish the added benefits of nurturing your skin and enhancing the luster of your hair. Unlock the simplicity of crafting apple juice with the following method:

    Ingredients:

    • 2 crisp apples
    • 1 refreshing glass of water
    • 1 teaspoon of natural sweetness
    • 1/4 teaspoon of savory black salt

    Method:

    Begin by delicately peeling the apples to unveil their pristine flesh, then carefully extract the seeds nestled within.

    Proceed to slice the apples into petite morsels and deposit them into a blender.

    Combine the essence of water and a hint of sweetness, pouring them into the blender as well.

    With grace, initiate the blender four to five times, artfully extracting the liquid essence of the apples.

    Then, with finesse, strain the elixir to refine its purity and sprinkle a pinch of tantalizing black salt atop.

    Prepare to immerse yourself in the delightful symphony of flavors as your homemade apple juice awaits, ready to captivate your senses.

    Boost Your Well-being with Refreshing Orange Juice

    Indulge in the ultimate vitamin C powerhouse – the orange! Discover a delightful way to strengthen your immune system, rejuvenate your skin, and fortify your hair. Experience an instant surge of energy and a refreshed mind with every sip of orange juice. Unlock a multitude of health benefits as you relish this citrus elixir. From anemia to kidney stones, cholesterol to diabetes, and even constipation, orange juice offers relief in a glass. Wondering which juice stands out as the most potent? Look no further than orange juice!

    Quench your thirst for wellness with this simple recipe:

    Ingredients:

    • 3-4 ripe oranges
    • 1 tablespoon of sugar (optional)
    • Pinch of black salt
    • A splash of water

    Method:

    1. Begin by peeling the oranges and removing the seeds.
    2. Place the peeled and deseeded oranges in a blender along with a splash of water.
    3. For those mindful of sugar intake, feel free to skip adding sugar.
    4. Blend the mixture until smooth and extract the freshly squeezed juice.
    5. Finally, strain the juice, sprinkle a pinch of black salt for an extra burst of flavor, and savor it to your heart’s content.

    Elevate your well-being and delight in the goodness of orange juice. Make it a part of your daily routine and relish the vibrant benefits it brings to your life. Cheers to a healthier you!

    Revitalizing Pineapple Juice: Unlock a World of Health and Delight

    Indulge in the exquisite taste of pineapple, a fruit cherished by countless individuals. Beyond its tantalizing flavor, this tropical wonder offers remarkable health benefits that will leave you invigorated. Bursting with a rich array of nutrients including vitamin C, vitamin B, vitamin B-6, iron, calcium, phosphorus, and zinc, pineapple stands as an unparalleled source of nourishment. Elevating its allure, this ambrosial elixir boasts abundant antioxidants. Brace yourself for a journey of wellness as pineapple juice fortifies your immune system, nurtures your heart’s well-being, relieves digestive ailments, and alleviates inflammation.

    Embark on a tantalizing adventure with these simple ingredients:

    • Fresh Pineapple (as desired)
    • 1 tablespoon of sugar
    • 1/2 teaspoon of black salt
    • 1 glass of pristine water

    Unveiling the preparation process:

    1. Immerse yourself in the art of pineapple peeling, ensuring not a single morsel is wasted.
    2. Slice the pineapple into dainty pieces after its alluring exterior is revealed.
    3. Introduce the delectable pineapple chunks into a blender, generously adding water and sugar.
    4. Activate the blender, allowing the flavors to harmonize and the essence of pineapple to be fully extracted during 5-6 blending intervals.
    5. With finesse, strain the juice, capturing its pristine essence, and infuse it with the subtle touch of black salt.
    6. At long last, savor the culmination of your efforts and allow your taste buds to revel in the captivating symphony of flavors.

    Unleash the power of pineapple and bask in the glory of its rejuvenating elixir. Elevate your well-being while sipping on this remarkable nectar, embracing the journey towards a healthier and more vibrant you.

    Carrot & Beetroot Juice

    Discover the extraordinary power of carrot and beetroot juice, a true elixir for vitality and well-being. Experience a multitude of benefits, from banishing weakness to fortifying digestion, from boosting blood count to nourishing your precious eyes and radiating healthy skin and hair. Unleash the detoxifying prowess of this remarkable juice, purifying your body and safeguarding it against diseases. Let us embark on a journey to unveil the secrets of crafting the perfect carrot and beetroot juice.

    Prepare yourself with these essential ingredients:

    • 1-2 carrots
    • 1 beetroot
    • 1 amla (Indian gooseberry)
    • A generous handful of fresh coriander leaves
    • Black salt (to taste)
    • Half a lemon

    Now, let’s embark on the transformational process:

    1. Begin by meticulously washing the carrots and beetroot, ensuring their pristine condition. Gently slice them into delightful bite-sized pieces.
    2. Treat the vibrant coriander leaves with care, granting them a refreshing rinse. Meanwhile, delicately cut the amla into small, enchanting fragments.
    3. Harmoniously combine all these awe-inspiring ingredients within a blender, adding a touch of water to facilitate the alchemical blending process.
    4. Witness the magic unfold as you blend the concoction to perfection, drawing out its essence. Filter the elixir into a separate container, preserving its purity.
    5. To further enrich your masterpiece, infuse the juice with a hint of black salt, unlocking an exquisite symphony of flavors. Add the invigorating tang of lemon juice for an unforgettable experience.
    6. Now, it’s time to savor the fruit of your labor. Immerse yourself in the captivating depths of flavor and let the revitalizing elixir nourish your body and soul.

    Indulge in the captivating allure of carrot and beetroot juice, and relish the transformative power it bestows upon you. Elevate your well-being and embark on a journey of vibrant health.

    Revitalizing Spinach Juice: Unlock Your Health Potential

    Discover the true essence of green vitality with the transformative power of spinach juice. This remarkable elixir, derived from the most nutrient-rich of all leafy greens, holds the key to unlocking a world of health benefits. While spinach is commonly known for its versatility in various culinary creations, its potential as a revitalizing juice should not be overlooked. Immerse yourself in the rejuvenating properties of this elixir and bid farewell to the shackles of anemia. Embrace a stronger skeletal foundation, nurture your heart and liver, optimize your digestion, and purify your body from within.

    Prepare to embark on a health journey with the following recipe:

    Ingredients:

    • 1 cup of fresh spinach
    • 1 glass of water
    • Optional: Small piece of ginger
    • Optional: A few mint leaves
    • ½ teaspoon of black salt

    Instructions:

    1. Begin by thoroughly washing the vibrant spinach leaves.
    2. Finely chop the leaves and place them in a blender.
    3. Likewise, wash the invigorating ginger and refreshing mint leaves before adding them to the blender.
    4. Pour in the water and blend until a velvety juice-like consistency is achieved.
    5. Strain the concoction meticulously to refine its texture.
    6. Finally, enhance the flavor with a squeeze of lemon juice and a pinch of black salt.

    Prepare to indulge in the embodiment of wellness – your revitalizing spinach juice is now ready to be savored and enjoyed. Unleash the power of nature’s bounty and elevate your well-being to new heights.

    Pomegranate Juice

    Discover the incredible power of pomegranate juice, renowned as one of the most potent elixirs on the planet. Trusted by doctors, this exceptional juice is recommended for those who seek to regain their strength and vitality. Experience the benefits of increased blood flow, improved immune system, a healthy heart, efficient digestion, and a radiant complexion. And as an added bonus, it may even reduce the risk of life-threatening diseases such as cancer.

    Ingredients

    • One cup of luscious pomegranate seeds
    • Half a cup of refreshing water
    • Black salt (according to your personal taste)

    Instructions

    Unlock the potential of the pomegranate by following these simple steps:

    1. Begin by skillfully peeling the pomegranate and extracting its precious seeds.
    2. Transfer the vibrant seeds into a blender jar and pour in the invigorating water.
    3. Activate the blender and witness the transformation into a harmonious blend of flavors. Once ready, strain the mixture to perfection.
    4. Behold! Your tantalizing pomegranate juice is now prepared to awaken your senses. For an extra touch of indulgence, add a pinch of black salt to elevate the taste.

    Amla Juice

    Unleash the hidden wonders of Amla, the cherished Indian gooseberry, a well-kept secret of health aficionados. Revel in the astonishing revelation that this small fruit packs more vitamin C than a multitude of oranges combined. Enriched with fiber, calcium, iron, and antioxidants, Amla stands as a formidable defender of your well-being, shielding your body from the clutches of illness.

    Indulging in the rejuvenating elixir of Amla juice is a gateway to an array of benefits. Elevate your health to new heights as it fortifies your immune system, alleviates the discomfort of cold and cough, fosters optimal digestion, resolves nagging stomach issues, purifies your body by eliminating toxins, strengthens your bones, safeguards your heart and liver, bestows a radiant glow upon your face, combats acne problems, and promotes lustrous locks of hair.

    Avocado Smoothie

    Embark on a transformative journey with the undisputed champion of powerful juices—the avocado smoothie. In the same league as Amla, this superfood boasts an abundance of healthy fats, vital vitamins, and essential minerals. Unleash its unparalleled potential to protect your heart, reducing the risk of cardiovascular ailments. Revel in stronger bones, a thriving liver, lowered cholesterol levels, and enhanced brain function. Elevate your well-being to new heights with the irresistible allure of the avocado smoothie.

    Ash Gourd Juice | Benefits, Uses, and Side Effects of Ash Gourd

    Adequate Vitamin B-12: The Key to Optimal Body Function

  • Ash Gourd Juice | Benefits, Uses, and Side Effects of Ash Gourd

    Ash Gourd Juice | Benefits, Uses, and Side Effects of Ash Gourd

    Discover the hidden gem of the culinary world – Ash Gourd! While often overlooked as a mere vegetable, this versatile produce is actually a fruit with incredible health benefits. Not only can it be transformed into delectable dishes and desserts, but its juice holds the key to unlocking a world of well-being.

    Unleash the power of Ash Gourd juice, a true elixir for your health. Strengthen your immune system, bid farewell to diabetes, obesity, ulcers, heart problems, and digestive issues. This natural nectar is a panacea for countless ailments, yet its potential remains undiscovered by many.

    Embark on a journey of enlightenment as we reveal the unparalleled advantages of Ash Gourd. Learn the art of consuming this extraordinary fruit and discover the secrets of crafting its invigorating juice. But that’s not all! Uncover the potential side effects and ensure a safe and fulfilling experience.

    Ash Gourd: The Epitome of Health

    Behold the Ash Gourd, a delightful fusion of fruit and vegetable. With its pale green exterior and snowy white flesh, this vine-grown gem is a feast for the senses. Its round yet elongated shape bears a resemblance to both watermelon and bottle gourd, offering a mild and pleasing taste.

    Dive into a world of culinary creativity with Ash Gourd. From savory salads to refreshing juices and tantalizing desserts, this versatile ingredient knows no bounds. But it is the juice of this remarkable fruit that truly steals the show. Prepare to cleanse your body, shield it from grave illnesses, and embrace a healthier lifestyle.

    Unlock the potential of Ash Gourd juice and let it detoxify your body, paving the way for a stronger and more resilient you. Don’t miss out on this life-changing elixir that holds the key to your well-being.

    Ash Gourd Juice

    Ash Gourd Benefits

    Unlock Your Health Potential with Ash Gourd

    Unhealthy eating habits, a sedentary lifestyle, and environmental pollution expose our bodies to a multitude of toxins and harmful substances, putting us at risk of various diseases. The consequences of toxin buildup manifest as weight gain, unpleasant breath, and issues with vital organs like the kidneys, liver, skin, and digestion. That’s why it is imperative to detoxify our bodies, and that’s where Ash Gourd comes to the rescue.

    Ash gourd juice is a powerful detoxifier, effectively eliminating toxins from your system. By incorporating this refreshing juice into your morning routine, you promote a healthy stomach, improve the functions of your kidneys, liver, and heart, and experience an overall sense of well-being. Moreover, the wonders of ash gourd extend to nourishing your skin and hair, providing a natural and holistic solution.

    Fortify Your Immunity with Ash Gourd

    In addition to detoxification, ash gourd offers remarkable benefits in boosting your immune system. Laden with essential vitamins and minerals, this extraordinary fruit shields your body from diseases. Ayurveda, the ancient Indian system of medicine, highly esteems ash gourd for its disease-fighting properties. Embracing the consumption of ash gourd not only eradicates ailments but also paves the path to optimal health.

    Unleash Your Weight Loss Journey with Ash Gourd

    Struggling with excess weight? Let ash gourd be your trusted companion on your weight loss journey. This natural wonder possesses potent anti-obesity properties, effectively combating stubborn fat deposits. Furthermore, it revs up your metabolism, propelling your weight loss efforts to new heights. When combined with regular exercise, incorporating Ash Gourd juice into your weight loss regimen can yield remarkable results. Take charge of your weight and embrace the transformative power of Ash Gourd.

    Manage Diabetes the Natural Way

    Diabetes poses a serious health challenge, but ash gourd emerges as an ally in your fight against this condition. With its low carbohydrate and sugar content, ash gourd helps regulate blood sugar levels. Additionally, it aids in eliminating unwanted substances from your body, making it particularly beneficial for individuals with elevated sugar levels. Scientific studies have also recognized the potential of ash gourd in managing diabetes. Remember, embracing dietary and lifestyle improvements is crucial in this endeavor.

    Nurture Your Digestive Health

    Your stomach deserves the best care, and ash gourd offers a host of benefits for digestive well-being. By consuming ash gourd juice each morning, you provide a soothing and cooling effect to your stomach, purging toxins from your digestive system. Bid farewell to indigestion, gas, acidity, burning sensations, and constipation as ash gourd strengthens your digestive system. Embrace the natural solution for your stomach ailments—ash gourd.

    Revitalize Your Kidneys

    Your kidneys play a vital role in maintaining your overall health, and ash gourd proves to be an excellent ally for kidney health. Packed with antioxidants, ash gourd supports your kidney’s well-being and aids in eliminating toxins, ensuring their optimal function. Numerous studies have confirmed the benefits of ash gourd in promoting kidney health, making it a wise choice for those seeking wellness from within.

    Embrace a Healthier Liver with Ash Gourd

    When it comes to your liver’s health, ash gourd takes center stage. Its detoxifying properties extend to your liver, effectively reducing inflammation and preserving its well-being. By incorporating ash gourd juice into your routine, you take a proactive step towards a healthier liver. Let ash gourd be your liver’s best friend.

    Combat Nasal Bleeding

    Say goodbye to the discomfort of nasal bleeding with ash gourd. Body heat and an imbalance of the Pitta dosha, according to Ayurveda, often trigger nosebleeds. The cooling effect of ash gourd helps alleviate this issue, providing relief and comfort. Although scientific research in this area is limited, ash gourd’s potential for resolving nasal bleeding should not be overlooked.

    Experience Refreshing Coolness

    Ash gourd not only hydrates your body but also offers respite from internal heat. In Ayurveda, it is revered as a cooling fruit, pacifying the Pitta dosha. Embrace the coolness of ash gourd and bid farewell to discomfort caused by excessive body heat, especially during scorching weather conditions.

    Rejuvenate Your Skin and Hair

    Ash gourd’s benefits extend beyond internal wellness to your external beauty. Rich in vitamins and minerals, this remarkable fruit nourishes your skin, enhancing its radiance and combating acne. Regular consumption of ash gourd juice gifts you with youthful skin that withstands the test of time. Moreover, its application as a gel promotes lustrous hair and effectively treats dandruff. Embrace the holistic wonders of ash gourd for both your skin and hair.

    Unlock the potential of Ash Gourd and transform your well-being. Embrace its detoxifying power, strengthen your immunity, embark on a weight loss journey, manage diabetes naturally, support your digestive system, and nurture your kidneys and liver. Say goodbye to nasal bleeding and excessive body heat while rejuvenating your skin and hair. Ash gourd is nature’s gift to your holistic health.

    How to Make Ash Gourd Juice

    Ash Gourd Juice

    Discover the simplicity of crafting your very own ash gourd juice in a matter of minutes! In just under 5 minutes, you can relish the refreshing taste of this delightful beverage. Allow me to guide you through the effortless process.

    Begin by giving the ash gourd a thorough rinse with fresh, clean water, ensuring its pristine quality.

    For a single glass of exquisite ash gourd juice, gather approximately 200-250 grams of this remarkable vegetable.

    Carefully peel away the top layer and discard the seeds, as they can lend a bitter note to the flavor.

    Next, proceed to slice the ash gourd into small, manageable pieces and transfer them into a blender.

    To extract the essence fully, add a suitable amount of water and blend the mixture until smooth and creamy.

    Once blended to perfection, gently strain the juice using a clean, fine cotton cloth, ensuring its purity and clarity.

    Behold! Your invigorating ash gourd juice is now prepared, brimming with wholesome goodness.

    Now, find a cozy spot to settle in and savor this magnificent creation sip by sip. Remember, it’s best enjoyed slowly, allowing each moment to unfold in pure delight. Avoid haste, for this rejuvenating elixir deserves your undivided attention.


    What is the taste of ash gourd?

    Discover the true essence of the ash gourd’s flavor, and prepare to be pleasantly surprised. Contrary to popular belief, the ash gourd does not possess a harsh or bitter taste; rather, it boasts a subtle, delicate flavor profile. Its mildness makes it the perfect candidate for a refreshing juice that you can effortlessly savor. For an added touch of indulgence, consider incorporating a hint of natural honey to elevate its taste. Avoid the temptation of sweetening it with sugar, as it detracts from the health benefits this remarkable gourd has to offer.

    Disadvantages of ash gourd

    Unlock the true potential of your health with the remarkable ash gourd. While this incredible vegetable boasts numerous health benefits, it’s essential to be aware of the minor setbacks associated with it.

    Indulging in ash gourd may not be suitable for individuals who are sensitive to cold temperatures, as its cooling properties might not align with their preferences.

    During the winter season, it’s wise to exercise moderation in consuming ash gourd to prevent any potential discomforts such as colds and coughs that may arise.

    Furthermore, it’s important to note that consuming ash gourd as a sweet may not contribute positively to your overall well-being.

    For expectant mothers, seeking professional advice from a doctor before including ash gourd in their diet is crucial for a safe and healthy experience.

    Remember, balance is key! While ash gourd offers numerous benefits, excessive consumption can have adverse effects on your body. Embrace its goodness in moderate amounts to harness its full potential while safeguarding your well-being.

    10 of the most powerful juices that will invigorate the body upon consumption

    Lactose Free Yogurt: A Delicious and Digestion-Friendly Alternative

  • Adequate Vitamin B-12: The Key to Optimal Body Function

    Adequate Vitamin B-12: The Key to Optimal Body Function

    It is crucial to guarantee appropriate consumption of vitamin B-12 for our bodies to operate effectively. This vital nutrient plays a crucial role in DNA and red blood cell production, energy generation, and the optimal functioning of the central nervous system. Unfortunately, as we age, our ability to absorb vitamin B-12 from food diminishes, making its deficiency more prevalent in older individuals. Surprisingly, pregnant and breastfeeding women, children, and young people are also prone to vitamin B-12 deficiency, which is often overlooked. Today, we will discuss some telltale signs that indicate a deficiency of this essential nutrient in the body, as advised by nutritionist and Ayurvedic physician Sonam.

    Infertility: A Consequence of Vitamin B-12 Deficiency

    One of the repercussions of vitamin B-12 deficiency is fertility issues in women. Maintaining adequate levels of B-12 in the body is crucial for a healthy pregnancy. If you find yourself deficient in vitamin B-12, consider incorporating other B complex vitamins into your diet, such as B-6 and folate, to support overall reproductive health.

    Adequate Vitamin B-12: The Key to Optimal Body Function

    Hypothyroidism: A Common Comorbidity

    Individuals suffering from hypothyroidism often exhibit low levels of vitamin B-12. It is recommended to include vitamin B-12 in your diet to help combat thyroid-related problems such as swelling, hair loss, and obesity. By ensuring a sufficient intake of vitamins and nutrients, you can improve your overall thyroid function.

    Depression: The Mental Toll of Vitamin B-12 Deficiency

    Depression

    In order to keep the central nervous system operating properly, vitamin B-12 is essential. Its deficiency can significantly impact mental health, leading to problems like depression, anxiety, and even dementia. Furthermore, a sulfur-containing amino acid called homocysteine is produced in greater amounts in the body when B-12 levels are insufficient. This elevation results in higher oxidative stress and DNA damage, exacerbating depressive symptoms. Therefore, it is vital to address vitamin B-12 deficiency to support optimal mental well-being.

    Low Energy Levels: A Consequence of Megaloblastic Anemia

    Adequate Vitamin B-12: The Key to Optimal Body Function

    Fatigue is a common complaint among individuals deficient in vitamin B-12. Megaloblastic anemia, a disorder where the body generates unusually big red blood cells that obstruct the effective passage of oxygen throughout the body, is frequently linked to this weariness. Ensuring an adequate intake of vitamin B-12 is crucial for maintaining optimal energy levels and preventing anemia-related fatigue.

    Burning or Tingling Sensations: Nervous System Implications

    A deficiency in vitamin B-12 can manifest as a tingling or burning sensation, particularly in the hands and feet. This occurs because vitamin B-12 plays a crucial role in maintaining a healthy nervous system. Ensuring sufficient intake of this vitamin can alleviate these uncomfortable sensations.

    Impact on Mental Health and Cognitive Function

    The deficiency of vitamin B-12 negatively impacts the nervous system, leading to difficulties in concentration and impaired cognitive function. Tasks may become more challenging, and overall mental clarity may be compromised. It is essential to address this deficiency to support optimal brain health and cognitive abilities.

    If you experience any of the symptoms mentioned above, it is imperative to consult a medical professional promptly. Since our bodies cannot produce vitamin B-12 on their own, obtaining it through plant-based foods or supplements is necessary. Making the regular practice of ensuring sufficient vitamin B-12 intake a priority will help maintain your overall well-being.

    Please feel free to express any questions or concerns you may have about your health in the comment section.below. We will strive to address them through our future articles. We urge you to spread the word if you find this material useful. Stay connected with thelatintwistcafe for more interesting and informative content.

    FAQ

    Q1: What are the consequences of vitamin B-12 deficiency in women?

    Vitamin B-12 deficiency in women can lead to fertility issues. Maintaining adequate levels of B-12 is crucial for a healthy pregnancy. Incorporating other B complex vitamins like B-6 and folate into the diet can support overall reproductive health.

    Q2: Is there a connection between hypothyroidism and vitamin B-12 deficiency?

    Yes, individuals with hypothyroidism often have low levels of vitamin B-12. Including vitamin B-12 in the diet can help combat thyroid-related problems such as swelling, hair loss, and obesity. It contributes to improving overall thyroid function.

    Q3: How does vitamin B-12 deficiency affect mental health?

    Vitamin B-12 plays a crucial role in the proper functioning of the central nervous system. Its deficiency can significantly impact mental health, leading to problems like depression, anxiety, and even dementia. Addressing vitamin B-12 deficiency is important for optimal mental well-being.

    Q4: Does vitamin B-12 deficiency cause low energy levels?

    Yes, individuals deficient in vitamin B-12 often experience fatigue. Vitamin B-12 deficiency is linked to megaloblastic anemia, a condition where the body produces unusually large red blood cells that hinder the effective passage of oxygen. Sufficient intake of vitamin B-12 is necessary to maintain optimal energy levels and prevent anemia-related fatigue.

    Q5: Can vitamin B-12 deficiency cause burning or tingling sensations?

    Yes, a deficiency in vitamin B-12 can manifest as a tingling or burning sensation, particularly in the hands and feet. Vitamin B-12 is essential for maintaining a healthy nervous system, and ensuring sufficient intake can alleviate these uncomfortable sensations.

    Home Pagehttps://thelatintwistcafe.com
    CafeClick here

    Lactose Free Yogurt: A Delicious and Digestion-Friendly Alternative

    calories in slice of pepperoni pizza: A Comprehensive Guide

    Natural Remedies for Relieving Throat Pain and Soreness

  • 6 Natural Remedies for Relieving Throat Pain and Soreness

    6 Natural Remedies for Relieving Throat Pain and Soreness

    A sore throat can be a result of various factors such as viral or bacterial infections, allergies, or vocal cord strain. While it is important to consult a doctor for persistent or severe symptoms, there are effective measures you can take at home to alleviate throat pain and soreness. In this article, we will explore natural remedies that can provide relief. These remedies range from gargling with saltwater to utilizing herbal treatments, all aimed at reducing inflammation, soothing the throat, and promoting comfort. Remember, if your symptoms worsen or persist over time, it is crucial to seek medical attention.

    I. Gargle with Saltwater

    Throat Pain and Soreness

    Gargling with saltwater is a simple yet effective remedy for reducing throat swelling and relieving pain. To prepare the solution, dissolve half a teaspoon of salt in a glass of warm water. Take small sips of the mixture, allowing it to reach the back of your throat without swallowing. Gently gargle for approximately 30 seconds before spitting out the solution. Repeat this process multiple times a day for optimal results. Saltwater gargles help to reduce inflammation, eliminate irritants, and provide a soothing effect on the throat.

    II. Honey and Warm Water

    Honey

    Another natural remedy worth considering is a mixture of honey with warm water or herbal tea. Add a teaspoon of honey to a cup of hot water or tea and stir the mixture slowly. Take small sips and allow the liquid to coat your throat. Honey possesses antibacterial properties that can help soothe throat irritation. However, it is important to note that honey should not be given to children under one year of age due to the risk of infant botulism.

    III. Stay Hydrated

    Stay Hydrated

    Maintaining proper hydration is crucial for throat health and preventing dryness, which can worsen throat pain and soreness. Ensure that you drink plenty of fluids such as water, herbal tea, or hot soups to keep your throat moist. Hydration aids in reducing inflammation, flushing out toxins, and promoting healing. Avoid excessive consumption of caffeine or alcohol as they can lead to dehydration and exacerbate your symptoms.

    IV. Lozenges or Throat Spray

    Over-the-counter lozenges or throat sprays can provide temporary relief by numbing the throat. These products often contain ingredients such as menthol or benzocaine, which help alleviate sore throat discomfort. Follow the instructions provided with the product and use them as necessary. However, it is important to note that these remedies address symptoms and do not treat the underlying cause of the sore throat.

    V. Steam Inhalation

    Steam inhalation can effectively alleviate throat soreness and relieve congestion. Boil a pot of water and carefully lean over it, creating a tent with a towel to trap the steam. Inhale the steam for 5-10 minutes, allowing it to reach your throat and nasal passages. The warm and moist steam helps reduce inflammation, soothe the throat, and ease congestion. Take caution to avoid burns or accidents while handling hot water.

    VI. Herbal Treatments

    Certain herbal teas, such as chamomile or slippery elm, possess soothing properties that can help reduce throat inflammation and discomfort. Brew a cup of herbal tea following the package instructions and sip it slowly. These teas provide relief by coating the throat and minimizing irritation. However, it is important to ensure that you are not allergic to any of the herbal ingredients before consuming them.

    Conclusion

    When experiencing throat pain and soreness, several natural remedies can be tried at home to find relief. Gargling with saltwater, using honey and warm water, staying hydrated, utilizing lozenges or throat sprays, practicing steam inhalation, and exploring herbal treatments can all contribute to reducing inflammation and soothing the throat. However, if your symptoms worsen, persist for an extended period, or are accompanied by severe symptoms, it is important to consult a healthcare professional for a proper diagnosis and appropriate treatment. Take care of your throat health by practicing good hygiene, avoiding irritants, and maintaining a healthy lifestyle.

  • Savory Salmon Cheese Steak Recipe | Easy and Delicious

    Savory Salmon Cheese Steak Recipe | Easy and Delicious

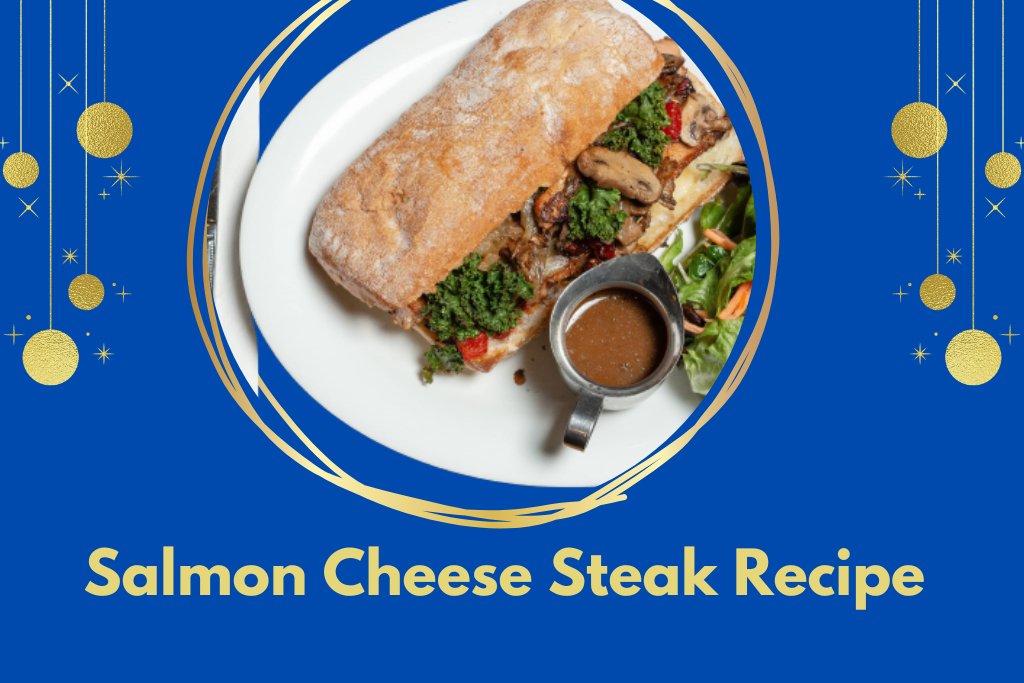
    Craving a mouthwatering salmon cheese steak recipe? Look no further! Discover a delightful blend of flavors with this easy-to-follow recipe that will leave you wanting more. Try it today!

    A delicious treat that will leave you wanting more is salmon cheese steak.

    Do you enjoy delicious flavors and are a culinary enthusiast? You’re in for a treat if so! The world of salmon cheese steak, a delectable meal that mixes the juicy flavor of salmon with the creamy deliciousness of cheese, will be explored in this essay. As we delve into this scrumptious dish, get ready to have your taste senses titillated. Get ready for a gourmet adventure that will leave you wanting more!

    The ideal fusion is between salmon and cheese.

    The rich flavor and delicate texture of salmon are usually the first things that spring to mind when you think about it. Well, picture mixing it with the deliciously creamy, melting cheese. The end product is a flavorful combination that blends harmoniously and is sure to take your breath away.

    The Best Salmon for Your Cheese Steak, Please!

    The type of fish you use is important in crafting the perfect salmon cheese steak. Choose responsibly sourced, fresh salmon that is of the highest quality. Salmon that has been fished wild is frequently regarded as the best due to its exceptional flavor and texture. To make sure that your dish stands out from the crowd, look for flesh that is a brilliant pink color and feels firm to the touch.

    Choosing the Correct Ingredients

    salmon cheese steak recipe

    Choosing the correct components is the first step in making the ideal salmon cheese steak. What you’ll need is as follows:

    1. Fresh salmon fillets: Select fish that is firm, shiny, and colorful. As a result of its excellent flavor and texture, wild-caught salmon is favoured.
    2. Cheese: Choose a cheese that melts well, like Gruyere, Cheddar, or Mozzarella. You may experiment with various cheese combinations to develop your own distinctive flavor profile.
    3. Seasonings: Use a range of seasonings, such as garlic powder, paprika, dried herbs, or lemon zest, to improve the flavor of your salmon cheese steak.
    4. Butter or olive oil: These fats will stop the salmon from sticking to the pan and give the dish more richness.
    5. Fresh herbs: For an added taste boost, top your salmon cheese steak with freshly chopped herbs like parsley, dill, or chives.

    The Cheese: Increasing Flavor

    Let’s talk cheese now! While there are many choices, certain kinds of cheese go particularly well with salmon. Creamy cheeses with a mild flavor, such as Boursin, Gruyere, or cream cheese, can give the fish a richer flavor and silky texture. Pick a cheese that melts easily and envelops the salmon with a delicious taste.

    How to Make the perfect Salmon Cheesesteak

    It’s critical to pay attention to the preparation procedure to produce a salmon cheese steak that stands out from the crowd. Here is a step-by-step instruction manual to assist you in reaching culinary perfection:

    1. To enhance the natural tastes of your salmon fillets, first season them with a little salt and pepper.
    2. Add a dab of olive oil to a skillet and heat it up over medium-high heat. Cook the salmon fillets with the skin side down in the pan for a few minutes, or until the skin is crisp and golden.
    3. Gently turn the fillets over, then generously sprinkle your preferred cheese over each one. To ensure that the cheese melts perfectly, lower the heat to medium-low and cover the skillet with a lid.
    4. Remove the salmon cheese steaks from the skillet after the cheese has melted, and set them aside to rest for a few seconds.
    5. Include a bed of fresh greens or your preferred side dish with your salmon cheese steaks. Every bite will be a great treat because to the diverse flavors and textures.

    A Symphony of Flavors: The Taste

    Let’s now discuss the flavor! Your taste will be treated to a symphony of flavors as you take your first mouthful of the salmon cheese steak. The creamy, melted cheese and the richness of the salmon combine to provide a delicious dish that is both decadent and filling. You’ll immediately see why this meal has become so well-liked among culinary fans after tasting even one bite.

    Salmon Cheese Steak Recipes: A Culinary Journey

    Salmon Cheesesteak Grilled

    Ingredients

    4 steaks of salmon
    Olive oil, two teaspoons
    2 minced garlic cloves
    one teaspoon of lemon juice
    pepper and salt as desired
    Four slices of provolone

    Instructions

    • Heat your grill to a moderately hot setting.
    • Mix the olive oil, minced garlic, lemon juice, salt, and pepper in a small bowl.
    • To ensure that the salmon steaks are evenly covered, brush the marinade over them.
    • The salmon steaks should be grilled for four to five minutes on each side, or until the fish flakes easily, on the prepared grill.
    • Add a piece of provolone cheese to each steak just before taking the fish from the grill.
    • For approximately a minute, shut off the grill and let the cheese melt.
    • Before serving, carefully move the salmon cheese steaks to a serving tray and give them some time to rest.
    • Enjoy serving with your favorite side dishes!

    Salmon Cheese Steak Baked

    salmon cheese steak recipe

    This recipe can satisfy your needs if you prefer the ease of an oven-baked dish. Let’s look at the procedures for making this tasty meal:

    Ingredients

    • 4 fillets of salmon
    • Olive oil, 1 tbsp
    • 1/9 cup Dijon mustard
    • one tablespoon of dried dill
    • 1/2 tsp. paprika
    • pepper and salt as desired
    • 4 Swiss cheese slices

    Instructions

    1. For best results, line a baking sheet with parchment paper and preheat the oven to 375°F (190°C).
    2. Olive oil, Dijon mustard, dried dill, paprika, salt, and pepper should all be combined in a small bowl. To produce a marinade, thoroughly stir.
    3. The salmon fillets should be well covered in marinade before being put on the prepared baking sheet.
    4. The salmon should be baked in the preheated oven for 12 to 15 minutes, or until the fish flakes easily.
    5. Each salmon fillet should have a piece of Swiss cheese on it once the baking sheet has been taken out of the oven.
    6. When the cheese is melted and bubbling, put the baking sheet back in the oven and broil for an additional two to three minutes.
    7. Transfer the cooked salmon cheese steaks with care to serving trays.
    8. If desired, garnish with fresh herbs like parsley or dill.
    9. Enjoy the delicious taste combination when serving hot!

    Cheesesteak with Teriyaki Glazed Salmon

    Are you looking to give your salmon cheese steak an Asian flair? The best option is to use this Teriyaki Glazed recipe! Let’s get to the planning:

    Ingredients

    • 4 steaks of salmon
    • Teriyaki sauce, 1/4 cup
    • Honey, two tablespoons
    • a serving of soy sauce
    • 1 teaspoon of ginger, grated
    • 2 minced garlic cloves
    • 4 cheddar cheese slices

    Instructions

    1. Mix the teriyaki sauce, honey, soy sauce, grated ginger, and chopped garlic in a small bowl.
    2. Put the salmon steaks in a small dish and cover them with the teriyaki glaze.
    3. At least 30 minutes, and up to an hour for a stronger taste, should be spent letting the salmon marinade in the refrigerator.
    4. Heat your grill to a moderately hot setting.
    5. With the extra glaze saved, take the salmon steaks out of the marinade.
    6. The salmon should be grilled for about 4-5 minutes on each side, basting often with the reserved glaze.
    7. Add a piece of cheddar cheese to the top of each salmon steak during the last minute of cooking.
    8. For approximately a minute, shut off the grill and let the cheese melt.
    9. Transfer the salmon cheese steaks with teriyaki glaze to a serving plate with care.
    10. For an additional touch of taste and appearance, top with sesame seeds and finely sliced green onions.
    11. For a full supper, serve with stir-fried veggies or steaming rice.

    Serving ideas and food pairings

    Think about serving your salmon cheese steak with the ideal sides to further improve your eating experience. Here are some ideas to tempt your taste buds:

    • Creamy Mashed Potatoes: The salmon cheese steak’s richness and the mashed potatoes’ velvety smoothness are a combination made in culinary paradise.
    • Sautéed Vegetables: Vegetables that have been lightly sautéed, including asparagus or zucchini, offer a light and colorful counterpoint to the dish’s heaviness.
    • Warm, garlicky deliciousness of crusty bread gives your food a pleasant crunch and a flavorful boost.

    Today, treat yourself to a salmon cheese steak.

    The salmon cheese steak is a must-try if you want to titillate your taste buds with a dish that mixes the delicate tastes of salmon with the creamy delight of cheese. Enjoy a symphony of tastes that will elevate your culinary experience and leave you wanting more. You may either make it yourself or get this delicious delicacy at a fine dining establishment nearby. Prepare to set off on a unique gastronomic experience!

    FAQs: Questions about Salmon Cheese Steak

    may I use frozen salmon in this recipe?

    Fresh salmon is better for flavor and texture, but frozen salmon may be used in place of it. Before cooking, be sure to properly defrost it, then pat it dry to eliminate any remaining moisture.

    Is it okay to substitute another fish for the salmon?

    Definitely! Other fish, such cod or trout, can be substituted in this dish. According to the thickness of the fish fillets, adjust the cooking time.

    may I use a different kind of cheese?

    You may try out several cheeses to choose the one that best suits your taste. Just be sure to pick a cheese that melts properly and goes well with the fish’s taste.

    Can I grill the salmon rather than bake it?

    Of course! The salmon can be grilled to give the meal a smokey taste. The salmon should be cooked on the grill until it flakes easily with a fork, so preheat it to medium-high heat. Before serving, sprinkle the cheese mixture on top and allow it to melt.

    may I make the salmon and cheese topping for the salmon cheese steak ahead of time?

    Although the meal is best when eaten right away, you may make the salmon and cheese topping ahead of time. Just before serving, combine and cook them after storing them individually in sealed containers in the refrigerator.

    What sides are appropriate to pair with salmon cheese steak?

    There are countless alternatives! You may serve your salmon cheese steak with mashed potatoes, roasted veggies, or a crisp salad. You have a choice!

    Can I use fish that has been frozen for these recipes?

    In these recipes, frozen salmon is OK. Before marinating or frying the salmon, let it defrost overnight in the refrigerator.


    Which side dishes pair well with salmon cheese steak?

    Roasted vegetables, garlic mashed potatoes, steaming asparagus, or a crisp garden salad are a few delicious possibilities for side dishes.

    Can the cheese in these recipes be replaced?

    Definitely! Depending on your preferences, feel free to try out various cheeses. You may choose from mozzarella to blue cheese.

    Do these recipes work well whether grilling inside or outside?

    Both! The salmon cheese steaks may be grilled on an outdoor grill or indoors using a stovetop grill pan.

    Can I substitute another seafood with the salmon?

    Although the recipes were created primarily for salmon, you can experiment with trout or halibut for a comparable outcome.

    How long should the salmon be marinated for the best flavor?

    To allow the flavors to meld, marinate the salmon for at least 30 minutes. You may marinate it for up to an hour for a stronger flavor.

    Home Pagehttps://thelatintwistcafe.com
    CafeClick here
  • calories in slice of pepperoni pizza: A Comprehensive Guide

    calories in slice of pepperoni pizza: A Comprehensive Guide

    calories in slice of pepperoni pizza: Pizza unquestionably occupies a particular place in the stomachs and hearts of people all around the world when it comes to popular comfort meals. It’s little wonder that pizza is a popular choice for many people with its seductive fragrance, ooey cheese, and scrumptious toppings. Pepperoni pizza is one of the most popular types of pizza. It is distinguished by its zesty, mildly spicy slices of cured pepperoni, which are arranged on top of melted cheese and tart tomato sauce. We’ll go into the world of pepperoni pizza in this post and examine how many calories are generally included in one piece.

    Pizza from Pepperoni is an unbeatable treat.

    An famous pizza classic in the world of pizza is pepperoni pizza. Pizza lovers all around the world are enamored with it because of the way its flavors and textures are combined. The crispy edges of the pepperoni compliment the melty cheese and the thick tomato sauce, creating the ideal harmony of savory and tangy flavors in a single slice of pepperoni pizza. What about the amount of calories, though? Let’s look more closely.

    The number of calories in slice of pepperoni pizza

    The quantity of calories in a slice of pepperoni pizza can vary based on a variety of variables, including the size of the slice, the crust’s thickness, the amount of cheese, and the particular brand or recipe used. However, we can give you a broad approximation to aid in your comprehension.

    With a circumference of around 14 inches, a regular-sized piece of pepperoni pizza typically has 285 to 350 calories. This estimation is predicated on a typical hand-tossed crust, a modest amount of cheese, a liberal distribution of pepperoni pieces, and a typical amount of tomato sauce. It’s important to keep in mind that versions with thin-crust or deep-dish may have somewhat varying calorie counts.

    Determinants of Calorie Content

    calories in slice of pepperoni pizza

    It’s crucial to look at the main elements of a slice of pepperoni pizza in order to comprehend the calorie count. Let’s dissect them:

    1. Crust: The base of every pizza slice is the crust. The number of calories in a crust might vary depending on its crust type, such as thin, thick, or filled. Due to their higher dough content, thicker crusts usually have more calories, whereas thin crusts provide a lighter option.
    2. Cheese: Pizza contains a lot of calories from cheese. A typical topping for pizza, mozzarella has between 70 and 85 calories per ounce. The calorie content of a slice depends on how much cheese is placed on it. It might be apparent to apply a thick coating or a little sprinkle.
    3. Pepperoni: Pepperoni is a well-liked pizza topping that gives the dish flavor and a touch of heat. Per ounce, it normally has between 140 and 150 calories. The total quantity of calories depends on how many slices of pepperoni are on each pizza slice.
    4. Tomato Sauce: Pizza’s tasty basis is tomato sauce. Although it typically has less calories, the amount used can affect the total number of calories. In relation to sauce, moderation is crucial.

    Making Knowledgeable Decisions

    By knowing about how many calories are in a piece of pepperoni pizza, you may enjoy this delicious food with more knowledge. Consider the following advice if you’re watching your caloric intake or working toward a particular nutritional objective:

    1. Portion Control: Limiting the number of slices you eat can help you control your calorie intake. To increase the nutritional content of your meal, serve it with a side salad or vegetable toppings.
    2. Alternative Crust Options: A few pizza joints provide possibilities for crust, such as gluten-free or cauliflower crust. These substitutes can accommodate certain dietary requirements and frequently contain less calories.
    3. Customization: Ask for changes to fit your tastes when ordering a pepperoni pizza. To lessen the overall calorie count, request less cheese, a thinner crust, or fewer pepperoni.
    4. Accents: Watch out for extra dipping sauces or condiments as these can drastically raise the calorie count of your meal. Choose lighter substitutes or consume them sparingly.

    You may still enjoy the flavors of a delectable piece of pepperoni pizza while keeping a balanced diet by being aware of the elements impacting the calorie count and making educated decisions.

    FAQ

    Q1: How many calories are typically found in a regular-sized slice of pepperoni pizza?

    A regular-sized slice of pepperoni pizza, with a circumference of approximately 14 inches, typically contains around 285 to 350 calories.

    Q2: What are the main factors that determine the calorie content of a slice of pepperoni pizza?

    The calorie content of a slice of pepperoni pizza is influenced by several key factors:

    1. Crust: The type of crust, whether thin, thick, or filled, can impact the calorie count. Thicker crusts generally have more calories due to their higher dough content, while thin crusts provide a lighter option.
    2. Cheese: Cheese contributes a significant amount of calories to pizza. The calorie content depends on the quantity of cheese applied to the slice, with mozzarella, a common topping, containing approximately 70 to 85 calories per ounce.
    3. Pepperoni: Pepperoni, a popular pizza topping, adds flavor and a touch of heat. It typically has around 140 to 150 calories per ounce. The total calorie count will depend on the number of pepperoni slices on each pizza slice.
    4. Tomato Sauce: The base of pizza, tomato sauce, usually has fewer calories. However, the amount used can affect the overall calorie count. Moderation in the application of sauce is important.

    Q3: What are some tips for making informed choices when consuming pepperoni pizza?

    If you’re mindful of your caloric intake or have specific nutritional goals, here are some tips for making informed choices while enjoying pepperoni pizza:

    1. Portion Control: Limit the number of pizza slices you consume to manage your calorie intake. Pair your meal with a side salad or vegetable toppings to increase its nutritional value.
    2. Alternative Crust Options: Some pizza establishments offer alternative crust options, such as gluten-free or cauliflower crusts. These alternatives cater to specific dietary requirements and often have fewer calories.
    3. Customization: When ordering a pepperoni pizza, feel free to request modifications to suit your preferences. Ask for less cheese, a thinner crust, or fewer pepperoni slices to reduce the overall calorie count.
    4. Accents: Be cautious with additional dipping sauces or condiments, as they can significantly increase the calorie content of your meal. Opt for lighter alternatives or consume them sparingly.

    By understanding the elements that affect calorie counts and making educated decisions, you can still savor the flavors of a delicious slice of pepperoni pizza while maintaining a balanced diet.

    Q4: Does the calorie count mentioned for pepperoni pizza slices apply to all pizza crust types?

    The provided calorie count for pepperoni pizza slices is based on a typical hand-tossed crust. It’s important to note that different crust types, such as thin-crust or deep-dish, may have slightly varying calorie counts. The thickness and ingredients used in the crust can impact the overall calorie content of the pizza slice.

    Home Pagehttps://thelatintwistcafe.com
    CafeClick here